一般我们开发的WordPress免费插件都会提交到WordPress官方网站,以便实现在线安装和一键更新。但如果我们开发的是WordPress收费插件,或者插件无法提交到WordPress官方,那就只能自托管了,这个时候,如何为插件添加在线更新功能呢?
今天,倡萌分享的是来自@Misha Rudrastyh的教程,希望可以帮助到有需要的朋友。
第1步:在服务器上创建具有更新信息和插件zip压缩包的.json文件
WordPress 的更新API接受某些参数,例如插件名称、作者、更新历史等。您可以:
- 在您的插件文件中直接指定其中的一些静态文件(插件作者、插件名称..),并从更新服务器获取其他文件(下载网址、新版本、上次更新)。
- 或者,您可以从更新服务器中获取所有内容。
在本教程中,我将向您展示第一种方法,因为它更加清晰易懂。
首先,您必须在服务器上的某个位置创建一个.json文件,例如YOUR_WEBSITE/info.json。然后这个文件应该包含下面的相关参数:
{
	"version" => "1.1",
	"download_url" : "https://rudrastyh.com/misha-plugin.zip",
	"requires" : "3.0",
	"tested" : "4.8.1",
	"requires_php" : "5.3",
	"last_updated" : "2017-08-17 02:10:00",
	"sections" : {
		"description" : "This is the plugin to test your updater script",
		"installation" : "Upload the plugin to your blog, Activate it, that's it!",
		"changelog" : "<h4>1.1 –  January 17, 2020</h4><ul><li>Some bugs are fixed.</li><li>Release date.</li></ul>"
	},
	"banners" : {
		"low" : "https://YOUR_WEBSITE/banner-772x250.jpg",
		"high" : "https://YOUR_WEBSITE/banner-1544x500.jpg"
	},
	"screenshots" : "<ol><li><a href='IMG_URL' target='_blank'><img src='IMG_URL' alt='CAPTION' /></a><p>CAPTION</p></li></ol>"
}还有很多其他参数,我将在下面介绍所有这些参数。您可以选择在info.json文件中指定哪个参数。
并且我们需要注意下zip插件包的文件结构:
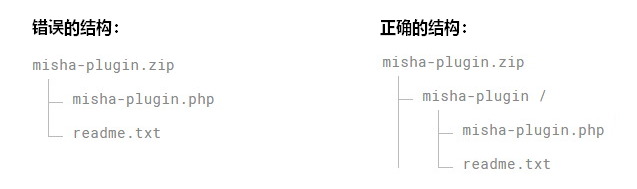
正确的做法是连同插件文件夹一起压缩,而不是仅仅压缩插件文件夹内部的文件。否则,当点击“更新”按钮后,旧版本的插件将被删除,但新版本插件并不会生效,因为WordPress会随机生成类似于misha-plugin-xhfuif的插件文件夹,并且将返回错误:“由于错误,misha-plugin.php已被停用:插件文件不存在。”
第2步:自定义插件弹窗信息
当您单击“查看详细信息”时,WordPress会从WordPress的服务器显示相应的插件信息。最有趣的是,该信息可以通过钩子定制,并在WordPress连接到它自己的服务器之前生效。 因此,它不会影响网站的性能。
相关的代码如下:
add_filter('plugins_api', 'misha_plugin_info', 20, 3);
/*
 * $res empty at this step
 * $action 'plugin_information'
 * $args stdClass Object ( [slug] => woocommerce [is_ssl] => [fields] => Array ( [banners] => 1 [reviews] => 1 [downloaded] => [active_installs] => 1 ) [per_page] => 24 [locale] => en_US )
 */
function misha_plugin_info( $res, $action, $args ){

	// 如果没有执行获取插件信息的操作,则不往下执行
	if( 'plugin_information' !== $action ) {
		return false;
	}

	$plugin_slug = 'YOUR PLUGIN SLUG'; //插件的slug别名,会在下面的代码中多次用到

	// 如果不是我们这个插件,不往下执行
	if( $plugin_slug !== $args->slug ) {
		return false;
	}

	// 尝试先通过缓存获取数据
	if( false == $remote = get_transient( 'misha_update_' . $plugin_slug ) ) {

		// info.json 是保存在你的服务器的文件
		$remote = wp_remote_get( 'https://rudrastyh.com/wp-content/uploads/info.json', array(
			'timeout' => 10,
			'headers' => array(
				'Accept' => 'application/json'
			) )
		);

		if ( ! is_wp_error( $remote ) && isset( $remote['response']['code'] ) && $remote['response']['code'] == 200 && ! empty( $remote['body'] ) ) {
			set_transient( 'misha_update_' . $plugin_slug, $remote, 43200 ); // 设置缓存12个小时
		}

	}

	if( ! is_wp_error( $remote ) && isset( $remote['response']['code'] ) && $remote['response']['code'] == 200 && ! empty( $remote['body'] ) ) {

		$remote = json_decode( $remote['body'] );
		$res = new stdClass();

		$res->name = $remote->name;
		$res->slug = $plugin_slug;
		$res->version = $remote->version;
		$res->tested = $remote->tested;
		$res->requires = $remote->requires;
		$res->author = '<a href="https://rudrastyh.com">Misha Rudrastyh</a>';
		$res->author_profile = 'https://profiles.wordpress.org/rudrastyh';
		$res->download_link = $remote->download_url;
		$res->trunk = $remote->download_url;
		$res->requires_php = '5.3';
		$res->last_updated = $remote->last_updated;
		$res->sections = array(
			'description' => $remote->sections->description,
			'installation' => $remote->sections->installation,
			'changelog' => $remote->sections->changelog
			// 你还可以在这里添加自定义的选项卡
		);

		// 假如你需要添加缩略图部分,请按照下面的格式添加图片内容
		// <ol><li><a href="IMG_URL" target="_blank"><img src="IMG_URL" alt="CAPTION" /></a><p>CAPTION</p></li></ol>
		if( !empty( $remote->sections->screenshots ) ) {
			$res->sections['screenshots'] = $remote->sections->screenshots;
		}

		$res->banners = array(
			'low' => 'https://YOUR_WEBSITE/banner-772x250.jpg',
			'high' => 'https://YOUR_WEBSITE/banner-1544x500.jpg'
		);
		return $res;

	}

	return false;

}
接下来简单描述下一些上面没有提及的参数:
contributors:贡献者(contributors)字段信息为wordpress.org个人资料名称和网址的关联数组,例如
array(
	'rudrastyh' => 'https://profiles.wordpress.org/rudrastyh',
	'contributer' => 'https://profiles.wordpress.org/contributer'
)
requires_php:最低PHP版本要求
rating:评分,从 1 到 100
ratings:5星评价中各个星级的得分次数
array(
	5 => 2104
	4 => 116,
	3 => 64,
	2 => 57,
	1 => 175
)num_ratings:所有评分的总数

support_threads:相关的论坛文章数
support_threads_resolved:已解决的论坛文章数
active_installs:插件的安装数量
added:添加日期,YYYY-MM-DD格式的日期
homepage:插件的主页网址
reviews:插件的点评,例如

versions:插件各个版本以及对应的下载网址数组,例如
array(
	'1.0' => 'URL of zip archive of 1.0 plugin version',
	'trunk' => 'URL of the latest plugin version'
)donate_link:捐助链接
第3步:将更新信息推送到WP Transients 中

add_filter('site_transient_update_plugins', 'misha_push_update' );

function misha_push_update( $transient ){

	if ( empty($transient->checked ) ) {
            return $transient;
        }

	$plugin_slug = 'YOUR PLUGIN SLUG'; //插件的slug别名,会在下面的代码中多次用到

	// 尝试先从缓存中获取信息,如果要禁用缓存,请注销 12,22,23,24,26 行的代码
	if( false == $remote = get_transient( 'misha_upgrade_' . $plugin_slug ) ) {

		// info.json 是在你自己的服务器上的文件
		$remote = wp_remote_get( 'https://YOUR_WEBSITE/SOME_PATH/info.json', array(
			'timeout' => 10,
			'headers' => array(
				'Accept' => 'application/json'
			) )
		);

		if ( !is_wp_error( $remote ) && isset( $remote['response']['code'] ) && $remote['response']['code'] == 200 && !empty( $remote['body'] ) ) {
			set_transient( 'misha_upgrade_' . $plugin_slug, $remote, 43200 ); // 设置缓存12个小时
		}

	}

	if( $remote ) {

		$remote = json_decode( $remote['body'] );

		// 您安装的插件版本应该在下行代码中!你也可以动态获取它
		if( $remote && version_compare( '1.0', $remote->version, '<' ) && version_compare($remote->requires, get_bloginfo('version'), '<' ) ) {
			$res = new stdClass();
			$res->slug = $plugin_slug;
			$res->plugin = 'YOUR_PLUGIN_FOLDER/YOUR_PLUGIN_SLUG.php'; // 如果您的插件没有自己的目录,应该只填写YOUR_PLUGIN_SLUG.php
			$res->new_version = $remote->version;
			$res->tested = $remote->tested;
			$res->package = $remote->download_url;
           		$transient->response[$res->plugin] = $res;
           		//$transient->checked[$res->plugin] = $remote->version;
           	}

	}
        return $transient;
}
第4步:更新后清除缓存
最后一步是在更新插件后清除缓存。
add_action( 'upgrader_process_complete', 'misha_after_update', 10, 2 );

function misha_after_update( $upgrader_object, $options ) {
	if ( $options['action'] == 'update' && $options['type'] === 'plugin' )  {
		// 仅在新插件版本已安装时清除缓存
		delete_transient( 'misha_upgrade_YOUR_PLUGIN_SLUG' );
	}
}以上就是本文的所有内容,你还可以继续看该作者的《WordPress更新插件时检查授权许可》,再次感谢@Misha Rudrastyh。
推荐阅读: