在本文中,我将向你展示如何从WordPress管理后台使用 小工具管理WordPress主题的页脚区域。但是,我将向您展示的技术不仅限于页脚区域,而且可以应用于主题的其他不同部分。
大多数网站的页脚区域分为多个区域,如下面的html代码所示。这个基本示例使用PureCss创建四个列的页脚,当然,你也可以将其更改为使用Bootstrap或其他网格系统。
<section class="footer">

    <div class="pure-g">

        <div class="pure-u-1 pure-u-sm-1 pure-u-md-1 pure-u-lg-1-5 pure-u-xl-1-5">

            <section>

                <h4>Title</h4>

                [ Content ]

            </section>

        </div>

        <div class="pure-u-1 pure-u-sm-1-3 pure-u-md-1-3 pure-u-lg-1-5 pure-u-xl-1-5">

            <section>

                <h4>Title</h4>

                [ Content ]

            </section>

        </div>

        <div class="pure-u-1 pure-u-sm-1-3 pure-u-md-1-3 pure-u-lg-1-5 pure-u-xl-1-5">

            <section>

                <h4>Title</h4>

                [ Content ]

            </section>

        </div>

        <div class="pure-u-1 pure-u-sm-1-3 pure-u-md-1-3 pure-u-lg-1-5 pure-u-xl-1-5">

            <section>

                <h4>Title</h4>

                [ Content ]

            </section>

        </div>

    </div>

</section>注册小工具区域
首先,我们首先需要向WordPress管理后台注册其他小工具区域。 将以下代码复制到主题的functions.php文件中:
function register_widget_areas() {

  // 小工具区域代码添加到这里...

}

add_action( 'widgets_init', 'register_widget_areas' );在这里,我们使用add_action()函数将一个操作添加到widgets_init钩子,并注册回调函数register_widget_areas()。
这段代码还没什么功能,让我们来添加第一个小工具区域。像下面一样修改你的 functions.php新增的代码:
function register_widget_areas() {

  register_sidebar( array(
    'name'          => 'Footer area one',
    'id'            => 'footer_area_one',
    'description'   => 'This widget area discription',
    'before_widget' => '<section class="footer-area footer-area-one">',
    'after_widget'  => '</section>',
    'before_title'  => '<h4>',
    'after_title'   => '</h4>',
  ));

}

add_action( 'widgets_init', 'register_widget_areas' );现在,从register_widget_areas()函数内部,调用register_sidebar()函数并将其传递给选项数组。这些选项是:
- name: 小工具区域的名称,在WP后台中显示
- id: 小工具区域的唯一ID。必须全部为小写且不能有空格
- description: 将在管理后台显示的小工具区域的描述
- before_widget: 放置在小工具前面的一些html。通常,使用像div或section标签之类的开头的容器标签
- after_widget: 放置在小工具后面的一些html。通常,关闭容器标签(例如div或section标签)
- before_title: 放置在小工具标题前面的一些html。通常是H标题标签
- after_title: 放置在小工具标题后面的一些html。通常是一个关闭的H标题标签
注意:我们在这里使用register_sidebar()函数是因为WordPress的原始小工具将在文章内容旁边的侧边栏中使用。但是我们也可以注册多个小工具区域,只是在这里,名称可能会有些混乱。
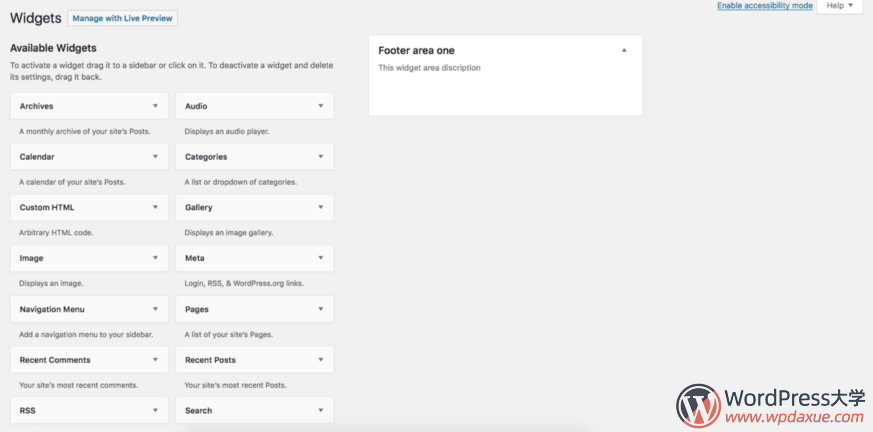
如果将上面的代码保存到主题functions.php文件中,然后访问“ 外观>小工具”,您将看到一个名为“Footer area one”的小工具区域,如下所示:

太好了,但是我们的页脚需要四个小工具区域,因此让我们再添加三个调用register_sidebar() 函数来扩展。
像下面一样更改你的functions.php相关代码:
function register_widget_areas() {

  register_sidebar( array(
    'name'          => 'Footer area one',
    'id'            => 'footer_area_one',
    'description'   => 'This widget area discription',
    'before_widget' => '<section class="footer-area footer-area-one">',
    'after_widget'  => '</section>',
    'before_title'  => '<h4>',
    'after_title'   => '</h4>',
  ));

  register_sidebar( array(
    'name'          => 'Footer area two',
    'id'            => 'footer_area_two',
    'description'   => 'This widget area discription',
    'before_widget' => '<section class="footer-area footer-area-two">',
    'after_widget'  => '</section>',
    'before_title'  => '<h4>',
    'after_title'   => '</h4>',
  ));

  register_sidebar( array(
    'name'          => 'Footer area three',
    'id'            => 'footer_area_three',
    'description'   => 'This widget area discription',
    'before_widget' => '<section class="footer-area footer-area-three">',
    'after_widget'  => '</section>',
    'before_title'  => '<h4>',
    'after_title'   => '</h4>',
  ));

  register_sidebar( array(
    'name'          => 'Footer area four',
    'id'            => 'footer_area_four',
    'description'   => 'This widget area discription',
    'before_widget' => '<section class="footer-area footer-area-four">',
    'after_widget'  => '</section>',
    'before_title'  => '<h4>',
    'after_title'   => '</h4>',
  ));

}

add_action( 'widgets_init', 'register_widget_areas' );
在这里,我们又调用了3次 register_sidebar()函数,并适当地修改了函数的参数选项,来添加了“Footer area two”、“Footer area three”等小工具区域……
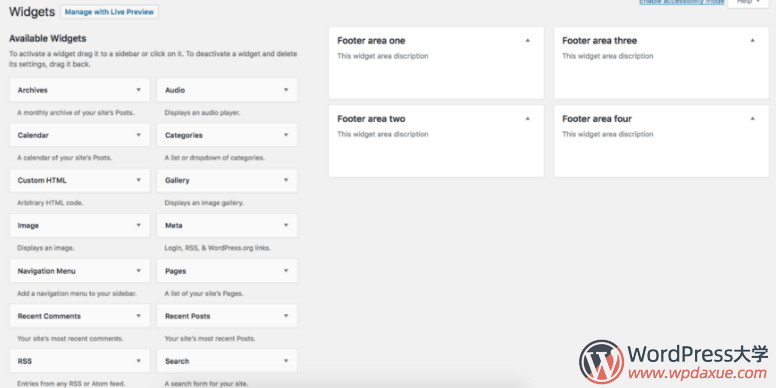
保存此代码,就可以在“外观>小工具”界面看到4个小工具区域,如下图所示:

在WordPress主题中显示小工具
此时,你可以从WordPress管理后台开始填充小工具区域。但是你仍然需要一种使它们在主题中可见的方法。
要显示小工具区域的内容,你需要修改我们文章开头的html代码,为下面所示:
<section class="footer">

    <div class="pure-g">

        <div class="pure-u-1 pure-u-sm-1 pure-u-md-1 pure-u-lg-1-5 pure-u-xl-1-5">

            <?php dynamic_sidebar( 'footer_area_one' ); ?>

        </div>

        <div class="pure-u-1 pure-u-sm-1-3 pure-u-md-1-3 pure-u-lg-1-5 pure-u-xl-1-5">

            <?php dynamic_sidebar( 'footer_area_two' ); ?>

        </div>

        <div class="pure-u-1 pure-u-sm-1-3 pure-u-md-1-3 pure-u-lg-1-5 pure-u-xl-1-5">

            <?php dynamic_sidebar( 'footer_area_three' ); ?>

        </div>

        <div class="pure-u-1 pure-u-sm-1-3 pure-u-md-1-3 pure-u-lg-1-5 pure-u-xl-1-5">

            <?php dynamic_sidebar( 'footer_area_four' ); ?>

        </div>

    </div>

</section>在这里,我们使用dynamic_sidebar()函数显示小工具区域的输出。该dynamic_sidebar()需要一个参数作为唯一的ID,这就是你在使用 register_sidebar()函数注册小工具区域时的id 参数 。例如 footer_area_one或 footer_area_two 等…

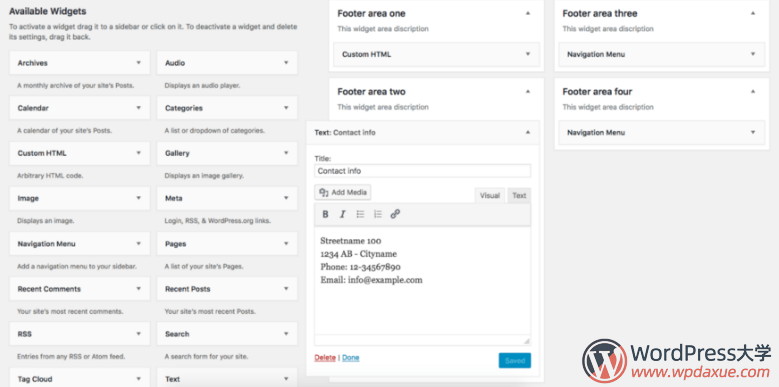
现在可以添加一些小工具到我们新建的小工具区域。比如上图,我们添加了一个文本小工具到 Footer area two,并填写了一些内容,保存 以后,我们就可以在前台页面的代码中看到下面的代码输出:
<div class="pure-u-1 pure-u-sm-1-3 pure-u-md-1-3 pure-u-lg-1-5 pure-u-xl-1-5">

    <section class="footer-area footer-area-two">

        <h4>Contact info</h4>

        <div class="textwidget">

            <p>Streetname 123<br />
            1234 AB – Cityname<br />
            Phone: 12-34567890<br />
            Email: info@example.com</p>

        </div>

    </section>

</div>请注意,小工具及其标题被我们之前传递给register-sidebar()函数的before_widget,after_widget,before_title和after_title的值所包围。
就是这么简单,你还可以使用该方法为主题不同地方添加不同的小工具区域!
参考: https://vanaf1979.nl/wordpress-adding-widget-areas-to-your-themes-footer/ ,由WordPress大学翻译整理,转载请保留该说明和本文网址。


