文本是《WordPress 媒体文件上传开发入门(共3篇)》专题的第 3 篇。阅读本文前,建议先阅读前面的文章:
在这个系列中,我们一起来看看在插件中执行WordPress的多媒体上传。这一系列及其相关的代码背后的想法,是让我们更清晰地了解它如何工作,如何使用它,以及如何将它纳入到我们的项目中。
关于这个,我们已经发布了以下文章:
而且,通过这些文章,我们完成了创造一个插件的过程,使用WordPress多媒体上传组件在我们博客的文章(页面)的页角上加入特色图片。
但还有一个问题:显示在相关文章(页面)的这个图片没有被保存。
在这篇文章中,我们将会介绍之前剩下的内容并且完成插件的剩余部分。请注意,我假设你已经阅读了之前的两篇文章并且理解了我们给出的对应功能的代码。
既然如此,让我们继续吧。
保存特色图片
能够在 WordPress 前端页面中显示图片的关键在于是否把根据提供的信息保存下来。
在之前的文章中,我们使用了一些信息在我们创建 MetaBox 显示,但是这些信息都没有被真正地保存下来。因此,这些图片
我们会修正这个问题。尤其是,准备保存下面的信息:
- 图片的 URL,也就是我们看到图片的 src 属性
- 图片的标题,也就是我们看到图片的 alt 和 title 属性
元数据介绍
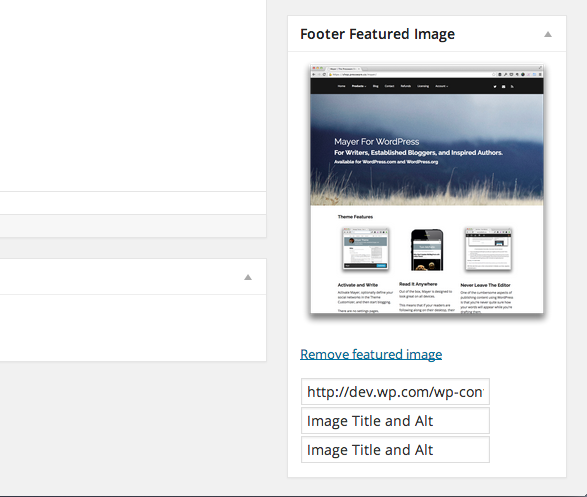
我们需要做的第一件事情是使用三个 input 框作为容器添加到在插件的显示页面 admin.php 中。
让我们看一下下面的代码:
<p id="featured-footer-image-meta">
    <input type="text" id="footer-thumbnail-src" name="footer-thumbnail-src" value="" />
    <input type="text" id="footer-thumbnail-title" name="footer-thumbnail-title" value="" />
    <input type="text" id="footer-thumbnail-alt" name="footer-thumbnail-alt" value="" />
</p><!-- #featured-footer-image-meta -->
从一开始,就应该很容易理解:
- 我们已经添加了一个唯一标示符为
featured-footer-image-meta的容器 包含三个 input 文本框,每一个表示将要保存的图片元素属性信息
写的这里,我们需要返回到之前的 JavaScript 文件中,这样就可以获取到通过多媒体上传组件和 input 框中的信息。
打开 admin.js 然后在处理函数(用于注册 file_frame 事件)的后面添加下面三行代码。
// Store the image's information into the meta data fields
$( '#footer-thumbnail-src' ).val( json.url );
$( '#footer-thumbnail-title' ).val( json.title );
$( '#footer-thumbnail-alt' ).val( json.title );
从现在开始,打开你的 WordPress 的仪表盘,添加或者编辑一篇已经存在的文章,你应该就能看到类似下面图片的效果了:

假设你已经直接把所有的 JavaScript 都写完了,那么当你通过多媒体上传组件选择了图片之后,就应该能看到一些内容了。
然而,当你点击”移除特色图片“后文本还在。
尽管还有其他方法可以实现,我这里给出下面的一种:
// Finally, we reset the meta data input fields
$( '#featured-footer-image-info' )
    .children()
    .val( '' );
记住这些代码要写在“移除特色图片”事件的处理函数中。在之前的文章中,我们定义了 resetUploadForm 这个函数。
写到这里,你应该能够点击“移除特色图片”并且看到图片和input框被重置了。如果遇到问题的话,请查看关联在本文的 GitHub 库中的源代码(应该是在分支中,版本号额为1.0.0)。
保存元数据
现在我们需要再往插件中添加一些代码,把和文章关联的input框的值过滤后保存到数据库中,这样我们就可以在每篇文章的底部显示这些信息了。
在函数 Acme_Footer_Image 中,添加下面的代码:
add_action( 'save_post', array( $this, 'save_post' ) );
然后,我们需要定一个将 input 框内的值保存到数据库的函数。关于下面的代码有两件事情需要了解:
- 在我们保存之前需要对数据进行过滤
- 我们使用唯一标示符来关联这些值,方便后需要在前端页面显示图片
/**
 * Sanitized and saves the post featured footer image meta data specific with this post.
 *
 * @param    int    $post_id    The ID of the post with which we're currently working.
 * @since 0.2.0
 */
public function save_post( $post_id ) {

    if ( isset( $_REQUEST['footer-thumbnail-src'] ) ) {
        update_post_meta( $post_id, 'footer-thumbnail-src', sanitize_text_field( $_REQUEST['footer-thumbnail-src'] ) );
    }

    if ( isset( $_REQUEST['footer-thumbnail-title'] ) ) {
        update_post_meta( $post_id, 'footer-thumbnail-title', sanitize_text_field( $_REQUEST['footer-thumbnail-title'] ) );
    }

    if ( isset( $_REQUEST['footer-thumbnail-alt'] ) ) {
        update_post_meta( $post_id, 'footer-thumbnail-alt', sanitize_text_field( $_REQUEST['footer-thumbnail-alt'] ) );
    }

}
准备测试,在前端页面中显示之前,对于仪表盘我们需要做两个改变。
首先,我们需要把元数据回显到 input 框中。写到文件 admin.php 中,并且把下面的包含进去然后更新:
<p id="featured-footer-image-info">
    <input type="text" id="footer-thumbnail-src" name="footer-thumbnail-src" value="<?php echo get_post_meta( $post->ID, 'footer-thumbnail-src', true ); ?>" />
    <input type="text" id="footer-thumbnail-title" name="footer-thumbnail-title" value="<?php echo get_post_meta( $post->ID, 'footer-thumbnail-title', true ); ?>" />
    <input type="text" id="footer-thumbnail-alt" name="footer-thumbnail-alt" value="<?php echo get_post_meta( $post->ID, 'footer-thumbnail-alt', true ); ?>" />
</p><!-- #featured-footer-image-meta -->
这里,我们调用函数 get_post_meta 获取已经保存(通过我们之前声明的函数)好的值。
下一步,我们需要确保把值设置到图片元素中——之前在这个系列中创建的:
<div id="featured-footer-image-container" class="hidden">
    <img src="<?php echo get_post_meta( $post->ID, 'footer-thumbnail-src', true ); ?>" alt="<?php echo get_post_meta( $post->ID, 'footer-thumbnail-alt', true ); ?>" title="<?php echo get_post_meta( $post->ID, 'footer-thumbnail-title', true ); ?>" />
</div><!-- #featured-footer-image-container -->
当然,如果元数据是空的,将不会把值设置而且图片也不会显示。
假设所有都运行良好,当保存文章时你应该能够看到图片以及它关联的数据显示在了 input 框中。简单地当你移除特色图片时,这些值将会被清空,图片也不会显示了。
资源清理
在我们继续在前端页面中显示图片,为了能够清理 MetaBox 的显示我们还有一些事情需要做。
首先,我们需要确保所有的值之前的文本框都被隐藏。
<p id="featured-footer-image-info">
    <input type="hidden" id="footer-thumbnail-src" name="footer-thumbnail-src" value="<?php echo get_post_meta( $post->ID, 'footer-thumbnail-src', true ); ?>" />
    <input type="hidden" id="footer-thumbnail-title" name="footer-thumbnail-title" value="<?php echo get_post_meta( $post->ID, 'footer-thumbnail-title', true ); ?>" />
    <input type="hidden" id="footer-thumbnail-alt" name="footer-thumbnail-alt" value="<?php echo get_post_meta( $post->ID, 'footer-thumbnail-alt', true ); ?>" />
</p><!-- #featured-footer-image-meta -->
下一步,我们需要写一个小的 JavaScript 函数用来显示图片——当文章被保存时。这个函数会检查这图片的 URL 关联的文本框的值,如果不是空字符串的就会显示图片。
如果不是的话,将会显示空的图片。好了,我们把这个函数加入到我们的 JavaScript 文件中:
/**
 * Checks to see if the input field for the thumbnail source has a value.
 * If so, then the image and the 'Remove featured image' anchor are displayed.
 *
 * Otherwise, the standard anchor is rendered.
 *
 * @param    object    $    A reference to the jQuery object
 * @since    1.0.0
 */
function renderFeaturedImage( $ ) {

    /* If a thumbnail URL has been associated with this image
     * Then we need to display the image and the reset link.
     */
    if ( '' !== $.trim ( $( '#footer-thumbnail-src' ).val() ) ) {

        $( '#featured-footer-image-container' ).removeClass( 'hidden' );

        $( '#set-footer-thumbnail' )
            .parent()
            .hide();

        $( '#remove-footer-thumbnail' )
            .parent()
            .removeClass( 'hidden' );

    }

}
然后,在 DOM 加载完毕后调用这个 JavaScript 函数:
renderFeaturedImage( $ );
简单来说,当页面被加载后,它会判断 URL 是不是存在的。如果是的话,就会渲染图片并且给我们移除它的。否则,它只是显示一个空的图片框。
再说一次,如果你的这段代码有问题的话,可以再次查看本文在 GitHub 库中的代码:https://github.com/tutsplus/acme-footer-image
显示特色图片
写到这里,我们已经完成了所有在仪表盘中需要做的,因此是时候把图片显示在博客的前端页面中了。为了做到这一点,我们需要设定一个钩子函数去连接 the_content 动作(action),判断是否图片存在,如果存在的话就把它添加到文章内容中。
你需要添加下面的代码到类 Acme_Footer_Im-age 的运行方法中:
add_action( 'the_content', array( $this, 'the_content' ) );
下一步,我们需要写一个函数用来触发这个动作。这个函数将会判断当前页面是否为一个单一文章页面(因为我们不想在有更多用户标签的文章底部添加图片)。
下面是我们的代码:
/**
 * If the current post is a single post, check to see if there is a featured image.
 * If so, append is to the post content prior to rendering the post.
 *
 * @param   string    $content    The content of the post.
 * @since   1.0.0
 */
public function the_content( $content ) {

    // We only care about appending the image to single pages
    if ( is_single() ) {

        // In order to append an image, there has to be at least a source attribute
        if ( '' !== ( $src = get_post_meta( get_the_ID(), 'footer-thumbnail-src', true ) ) ) {

            // read the remaining attributes even if they are empty strings
            $alt = get_post_meta( get_the_ID(), 'footer-thumbnail-alt', true );
            $title = get_post_meta( get_the_ID(), 'footer-thumbnail-title', true );

            // create the image element within its own container
            $img_html = '<p id="footer-thumbnail">';
                $img_html .= "<img src='$src' alt='$alt' title='$title' />";
            $img_html .= '</p><!-- #footer-thumbnail -->';

            // append it to the content
            $content .= $img_html;

        }

    }

    return $content;

}
到此,我们已经有了一个可以在单一文章页面底部显示特色图片的完整功能的插件了。
总结
通过这个系列,我们介绍了很多关于最新版本多媒体上传组件的重要的内容。尽管在练习的文章中花了更多的时间来展示数据怎么从 MetaBox 到前端页面中,它仍然演示了如如何在一个插件中开发多媒体上传组件。
说到这里,可以有更多关于学习多媒体上传组件的内容可以在未来的文章中进行介绍。如果你感兴趣的话,请在下面留言好让我知道。最后,如果你对这个系列的文章有任何问题的话,也一定要留言。
不要忘记从GitHub库中把这个工程的源代码(https://github.com/tutsplus/acme-footer-image)下载下来,我希望在未来你用到多媒体上传组件时它能够给你带来帮助!
原文出自:http://code.tutsplus.com/tutorials/saving-images-with-the-wordpress-media-uploader–cms-22152
由 surenpi.com@wordpress大学 原创翻译,未经允许,禁止转载和采用本译文。


