在本文中,我将指导您完成为 WooCommerce 创建自定义支付网关插件时所需的所有步骤。
第1步:我们首先创建一个插件
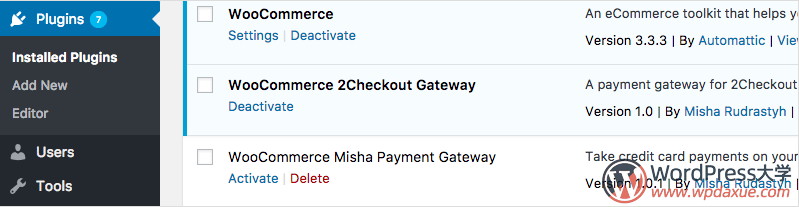
如果您不知道,自定义付款方式只是插件。所以我们必须创建一个。
当我第一次听说WordPress插件时,我认为创建插件非常困难。但是实际上,要创建一个插件,您只需要创建一个文件并在其中添加几行代码即可。
因此,在plugins文件夹中,我创建了misha-gateway.php文件,并在其中添加了以下代码。如果您的插件有多个文件,请将其放在具有相同名称的文件夹中,例如:misha-gateway/misha-gateway.php。
<?php
/*
 * Plugin Name: WooCommerce Custom Payment Gateway
 * Plugin URI: https://rudrastyh.com/woocommerce/payment-gateway-plugin.html
 * Description: Take credit card payments on your store.
 * Author: Misha Rudrastyh
 * Author URI: http://rudrastyh.com
 * Version: 1.0.1
 */
完成后,该插件将显示在您的管理区域中!您甚至可以激活它。
第2步:创建支付网关PHP类框架
因此,我们必须创建一个自定义 PHP 类来扩展 WooCommerceWC_Payment_Gateway类。
每个类方法如下所述。您可以首先将以下代码复制并粘贴到主插件文件中。
/*
 * 这个动作挂钩将我们的PHP类注册为WooCommerce支付网关
 */
add_filter( 'woocommerce_payment_gateways', 'misha_add_gateway_class' );
function misha_add_gateway_class( $gateways ) {
	$gateways[] = 'WC_Misha_Gateway'; // 这里添加类名
	return $gateways;
}

/*
 * 类本身,请注意,它挂载到plugins_loaded动作钩子内
 */
add_action( 'plugins_loaded', 'misha_init_gateway_class' );
function misha_init_gateway_class() {

	class WC_Misha_Gateway extends WC_Payment_Gateway {

 		/**
 		 * 类构造函数,在第3步中有更多关于它的信息
 		 */
 		public function __construct() {

		...

 		}

		/**
 		 * 插件选项,我们也在第3步中处理它
 		 */
 		public function init_form_fields(){

		...

	 	}

		/**
		 * 如果您需要自定义信用卡表格,则将需要它,步骤4就是关于它的
		 */
		public function payment_fields() {

		...

		}

		/*
		 * 自定义CSS和JS,在大多数情况下,仅在您决定使用自定义信用卡表格时才需要
		 */
	 	public function payment_scripts() {

		...

	 	}

		/*
 		 * 字段验证,更多信息请参见第5步
		 */
		public function validate_fields() {

		...

		}

		/*
		 * 我们正在此处处理付款,有关付款的所有步骤均在第5步中
		 */
		public function process_payment( $order_id ) {

		...

	 	}

		/*
		 * 如果您需要Webhook,例如PayPal IPN等
		 */
		public function webhook() {

		...

	 	}
 	}
}
如果您在插件文件中按“原样”插入代码,则会出现500错误,因为该代码仅显示插件类的结构,每个方法应在其中完善。
第3步:支付网关插件选项
在类构造函数中,我们:
- 定义类属性,例如网关ID和名称,第3-13行,
- 初始化设置,第15-19行,
- 将选项附加到类属性,第20-25行,
- 保存选项,第28行,
- 如果需要,将自定义JavaScript和CSS排入队列,第31行。
我们还可以在类构造函数中注册支付网关的webhooks(例如第34行的示例)。
public function __construct() {
$this->id = 'misha'; // 支付网关插件ID
$this->icon = ''; // 将显示在结帐页面上您的网关名称附近的图标的URL
$this->has_fields = true; // 如果您需要自定义信用卡形式
$this->method_title = 'Misha Gateway';
$this->method_description = 'Description of Misha payment gateway'; // 将显示在选项页面上
// 网关可以支持订阅,退款,保存付款方式,
// 但在本教程中,我们先从简单的支付开始
$this->supports = array(
'products'
);
// 具有所有选项字段的方法
$this->init_form_fields();
// 加载设置。
$this->init_settings();
$this->title = $this->get_option( 'title' );
$this->description = $this->get_option( 'description' );
$this->enabled = $this->get_option( 'enabled' );
$this->testmode = 'yes' === $this->get_option( 'testmode' );
$this->private_key = $this->testmode ? $this->get_option( 'test_private_key' ) : $this->get_option( 'private_key' );
$this->publishable_key = $this->testmode ? $this->get_option( 'test_publishable_key' ) : $this->get_option( 'publishable_key' );
// 这个动作挂钩保存设置
add_action( 'woocommerce_update_options_payment_gateways_' . $this->id, array( $this, 'process_admin_options' ) );
// 我们需要自定义JavaScript以获得令牌
add_action( 'wp_enqueue_scripts', array( $this, 'payment_scripts' ) );
// 您也可以在此处注册一个
// add_action( 'woocommerce_api_{webhook name}', array( $this, 'webhook' ) );
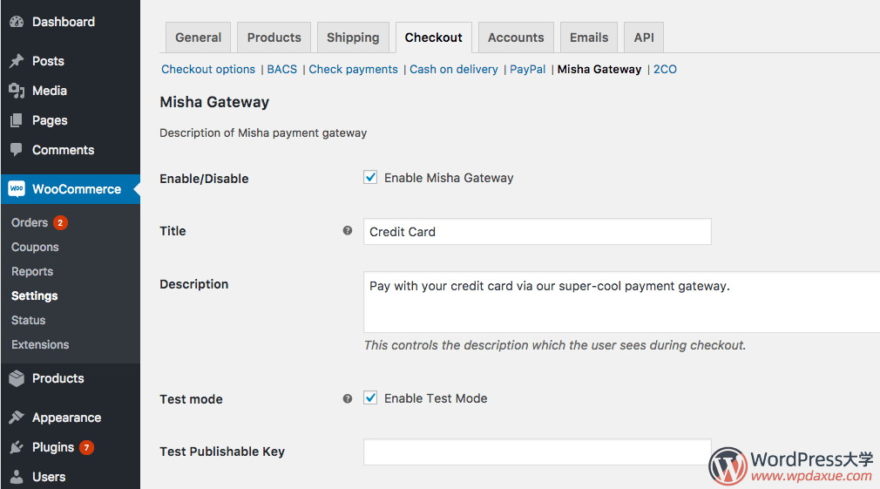
}根据您使用的付款处理器的不同,选项字段可能会有所不同,但是在大多数情况下,您将具有“已启用/已禁用”,“标题”,“描述”和“测试模式”选项。
public function init_form_fields(){

	$this->form_fields = array(
		'enabled' => array(
			'title'       => 'Enable/Disable',
			'label'       => 'Enable Misha Gateway',
			'type'        => 'checkbox',
			'description' => '',
			'default'     => 'no'
		),
		'title' => array(
			'title'       => 'Title',
			'type'        => 'text',
			'description' => 'This controls the title which the user sees during checkout.',
			'default'     => 'Credit Card',
			'desc_tip'    => true,
		),
		'description' => array(
			'title'       => 'Description',
			'type'        => 'textarea',
			'description' => 'This controls the description which the user sees during checkout.',
			'default'     => 'Pay with your credit card via our super-cool payment gateway.',
		),
		'testmode' => array(
			'title'       => 'Test mode',
			'label'       => 'Enable Test Mode',
			'type'        => 'checkbox',
			'description' => 'Place the payment gateway in test mode using test API keys.',
			'default'     => 'yes',
			'desc_tip'    => true,
		),
		'test_publishable_key' => array(
			'title'       => 'Test Publishable Key',
			'type'        => 'text'
		),
		'test_private_key' => array(
			'title'       => 'Test Private Key',
			'type'        => 'password',
		),
		'publishable_key' => array(
			'title'       => 'Live Publishable Key',
			'type'        => 'text'
		),
		'private_key' => array(
			'title'       => 'Live Private Key',
			'type'        => 'password'
		)
	);
}
如果您正确完成了所有操作,则您的选项页面应如下所示:
第4步:直接结帐表单
在实施以下代码之前,请阅读以下要点:
- 如果要创建类似PayPal的支付网关,所有用户操作都在支付网关网站上进行,则可以跳过此步骤,不用添加
payment_fields()和validate_fields()方法,然后继续执行第5步。 - 在本教程中,我假设您使用付款处理器,该处理器使用其自己的AJAX请求发送信用卡数据并为您提供可在PHP中使用的令牌,因此请不要向信用卡表单字段添加
name属性。步骤如下:- 客户填写他的信用卡数据,然后单击“下订单”按钮。
- 我们
checkout_place_order在WooCommerce中使用事件延迟了表单提交的时间,并将带有信用卡数据的AJAX请求直接发送到我们的付款处理方, - 如果客户详细信息确定,则处理者将返回令牌,我们将其添加到下面的表单中,
- 现在,我们可以提交表单(当然是用JS),
- 我们使用PHP中的令牌来通过付款处理器的API捕获付款。
4.1 引入脚本
在第2步中,我们已经向其中添加了wp_enqueue_scripts动作挂钩和连接 payment_scripts方法。
public function payment_scripts() {

	// 我们需要JavaScript仅在购物车/结帐页面上处理令牌,对吗?
	if ( ! is_cart() && ! is_checkout() && ! isset( $_GET['pay_for_order'] ) ) {
		return;
	}

	// 如果我们的付款网关被禁用,无需引入JavaScript
	if ( 'no' === $this->enabled ) {
		return;
	}

	// 如果没有设置API密钥,无需引入JavaScript
	if ( empty( $this->private_key ) || empty( $this->publishable_key ) ) {
		return;
	}

	// 如果是测试模式或非HTTPS下,无需执行
	if ( ! $this->testmode && ! is_ssl() ) {
		return;
	}

	// 假设我们的付款处理器JavaScript允许获取令牌
	wp_enqueue_script( 'misha_js', 'https://www.mishapayments.com/api/token.js' );

	// 这是我们在您的插件目录中使用的自定义js,它和token.js 一起工作
	wp_register_script( 'woocommerce_misha', plugins_url( 'misha.js', __FILE__ ), array( 'jquery', 'misha_js' ) );

	// 在大多数支付处理器中,您必须使用PUBLIC KEY来获得令牌
	wp_localize_script( 'woocommerce_misha', 'misha_params', array(
		'publishableKey' => $this->publishable_key
	) );

	wp_enqueue_script( 'woocommerce_misha' );

}
4.2 在JavaScript中获取令牌
首先,我想说的是,对于每个支付处理器而言,此代码可以有所不同,但是主要思想是相同的。这是misha.js文件的内容:
var successCallback = function(data) {

	var checkout_form = $( 'form.woocommerce-checkout' );

	// 将令牌添加到我们的隐藏输入字段中
	// console.log(data)查找令牌
	checkout_form.find('#misha_token').val(data.token);

	// 停用tokenRequest函数事件
	checkout_form.off( 'checkout_place_order', tokenRequest );

	// 现在提交表单
	checkout_form.submit();

};

var errorCallback = function(data) {
    console.log(data);
};

var tokenRequest = function() {

	// 这将是一个支付网关功能,处理来自表单的所有信用卡数据,
	// 也许它将需要您的Publishable API密钥,即misha_params.publishableKey
	// 并在成功时触发successCallback(),而在失败时触发errorCallback
	return false;

};

jQuery(function($){

	var checkout_form = $( 'form.woocommerce-checkout' );
	checkout_form.on( 'checkout_place_order', tokenRequest );

});
4.3 带有信用卡数据的表单
使用payment_fields()类方法,您可以使用以下信用卡字段创建付款表单:
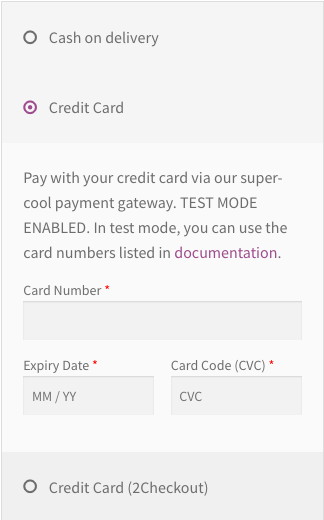
下面是代码:
public function payment_fields() {

	// OK,让我们显示付款形式之前的一些说明
	if ( $this->description ) {
		// 你可以为测试模式的说明,我的意思是测试卡号码等。
		if ( $this->testmode ) {
			$this->description .= ' TEST MODE ENABLED. In test mode, you can use the card numbers listed in <a href="#" target="_blank" rel="noopener noreferrer">documentation</a>.';
			$this->description  = trim( $this->description );
		}
		// 显示<p>标记包含的描述等
		echo wpautop( wp_kses_post( $this->description ) );
	}

	// 输出表单,但你可以关闭PHP标签和直接在HTML打印
	echo '<fieldset id="wc-' . esc_attr( $this->id ) . '-cc-form" class="wc-credit-card-form wc-payment-form" style="background:transparent;">';

	// 如果希望您的自定义支付网关支持它,请添加此操作挂钩
	do_action( 'woocommerce_credit_card_form_start', $this->id );

	// 我建议使用Inique ID,因为其他网关可能已经使用#ccNo, #expdate, #cvc
	echo '<div class="form-row form-row-wide"><label>Card Number <span class="required">*</span></label>
		<input id="misha_ccNo" type="text" autocomplete="off">
		</div>
		<div class="form-row form-row-first">
			<label>Expiry Date <span class="required">*</span></label>
			<input id="misha_expdate" type="text" autocomplete="off" placeholder="MM / YY">
		</div>
		<div class="form-row form-row-last">
			<label>Card Code (CVC) <span class="required">*</span></label>
			<input id="misha_cvv" type="password" autocomplete="off" placeholder="CVC">
		</div>
		<div class="clear"></div>';

	do_action( 'woocommerce_credit_card_form_end', $this->id );

	echo '<div class="clear"></div></fieldset>';

}
第5步:处理付款
5.1 验证字段
我知道诸如名字、姓氏之类的结帐字段应该进行验证,但这仅是示例:
public function validate_fields(){

	if( empty( $_POST[ 'billing_first_name' ]) ) {
		wc_add_notice(  'First name is required!', 'error' );
		return false;
	}
	return true;

}
5.2 使用API捕获付款并设置订单状态
说明文字有点多哦:
- 一旦您使用
wc_get_order()函数获得了订单对象,您可以使用它的方法,如get_billing_first_name(),get_billing_country(),get_billing_address_1()等,以获得客户的付款和发货的细节(顺便说一下,你可以 在WooCommerce插件文件夹的includes/class-wc-order.php找到所有的方法)。您也可以从$_POST数组中获取账单详细信息,在撰写本教程时,我不确定哪个更好。 - 您可以使用
$order->add_order_note()方法向订单添加备注,在编辑订单页面上可以是给客户的备注(将显示在会员区域)私人备注(仅在编辑订单页面上)。 - 在本教程中,我们考虑使用直接付款而不访问网关网站。但是,如果出于您的目的,客户必须访问支付网关网站来完成付款,则您必须跳过第4步,而在此步骤中,您可以使用
wp_remote_post()获取付款,用add_query_arg()为您的付款网关结帐页面建立正确的重定向URL。 - 使用
$order->get_total()获取订单金额。 get_woocommerce_currency()应该可以帮助您获取当前的商店货币。- 如果您的付款网关要求列出订单中的所有产品,请使用
$order->get_items(),您可以在此处找到一些示例。
public function process_payment( $order_id ) {

	global $woocommerce;

	// 我们需要它来获取任何订单详细信息
	$order = wc_get_order( $order_id );


	/*
 	 * 具有用于API交互的参数的数组
	 */
	$args = array(

		...

	);

	/*
	 * 可以使用wp_remote_post()构建您的API交互
 	 */
	 $response = wp_remote_post( '{payment processor endpoint}', $args );


	 if( !is_wp_error( $response ) ) {

		 $body = json_decode( $response['body'], true );

		 // 根据您的付款处理器的不同,这里是不同的
		 if ( $body['response']['responseCode'] == 'APPROVED' ) {

			// 我们收到了付款
			$order->payment_complete();
			$order->reduce_order_stock();

			// 给客户的一些备注(用false代替true使其变为私有)
			$order->add_order_note( 'Hey, your order is paid! Thank you!', true );

			// 空购物车
			$woocommerce->cart->empty_cart();

			// 重定向到“感谢页面”
			return array(
				'result' => 'success',
				'redirect' => $this->get_return_url( $order )
			);

		 } else {
			wc_add_notice(  'Please try again.', 'error' );
			return;
		}

	} else {
		wc_add_notice(  'Connection error.', 'error' );
		return;
	}

}
5.3 支付网关回调
我们可能需要操作付款网关回调(即时付款通知,Webhooks等)。
假设我们的自定义支付网关没有自己的信用卡数据表单,并且客户填写了帐单详细信息(如姓名,地址等)后,他将被重定向到支付网关网站。
我们如何检查付款是否完成并显示在我们的商店中?
手动吗?是吗 ?
许多付款网关都有付款通知,这就是它的工作方式—一旦客户在付款网关网站上完成了订单,网关就会向我们在网关的设置页面上设置的网站的特定网址发送带有$_GET参数的请求。WooCommerce允许处理这些请求。
WooCommerce 中的webshook URL(回调URL)如下所示: http://rudrastyh.com/wc-api/{webhook name}/ ,钩子名称可以任意,例如 paypal-payment-complete或 misha。这绝对不意味着您将在此处使用什么,主要要求是网址中的{webhook name}和过滤器中的{webhook name}(步骤3,第34行)必须匹配。
add_action( 'woocommerce_api_{webhook name}', array( $this, 'webhook' ) );并且webhook()是可以使用接收到的$_GET参数执行任何操作的函数(类方法)。
public function webhook() {

	$order = wc_get_order( $_GET['id'] );
	$order->payment_complete();
	$order->reduce_order_stock();

	update_option('webhook_debug', $_GET);
}
您不必在末尾添加 exit; 内容,因为一旦其中的代码被触发,它就会退出WordPress。
这就是本教程的全部内容。
下一步
如果您想知道如何将全新的自定义支付网关与 WooCommerce Checkout 块集成,请继续学习下一个教程。
如果您对 WooCommerce 的使用还不太了解,或者想系统学习 WooCommerce 开发,可以学习教程《WooCommerce 开发指南视频课程(使用详解/主题开发/支付宝网关开发)》。
声明:原文出自 https://rudrastyh.com/woocommerce/payment-gateway-plugin.html ,由WordPress大学翻译整理,转载请保留本声明。