如果你在开发Gutenberg区块或插件,你可能会遇到一个问题,就是如果为自己的区块或插件添加图标,今天我们就来分享一下,为古腾堡区块添加Dashicons或自定义SVG图标的方法。
WordPress 官方有一个字体图标库 Dashicons ,你可以直接通过添加图标的类名,来调用已有的图标。但是,如果你希望添加其他图标,那就需要采用自定义的svg图标了。
使用默认的WordPress Dashicons作为区块图标
使用 registerBlockType() 创建新区块时,参数之一是“ icon”。你可以使用任何默认的WordPress Dashicons 作为图标。
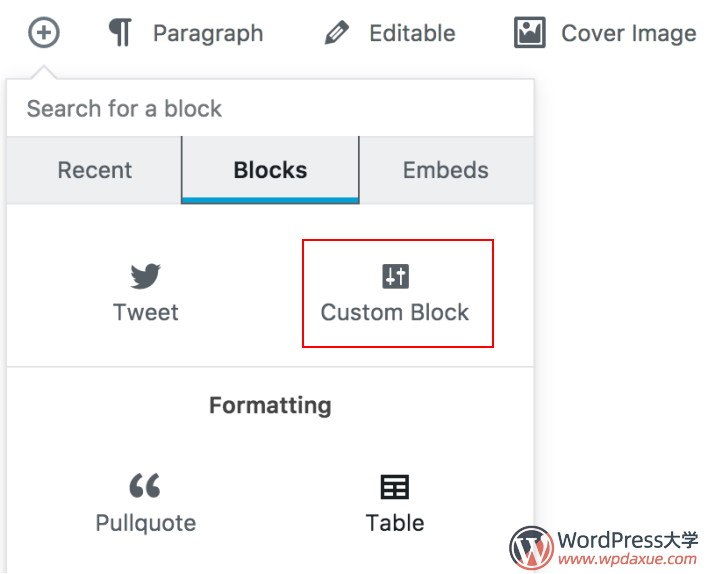
在下面的示例中,我们使用名为“ admin-settings ” 的图标,这将为我们的“Custom Block”设置了下图的图标。

以下就是我们的代码范例,注意看下icon参数的设置:
// Import __ from i18n internationalization library
const { __ } = wp.i18n;
// Import registerBlockType() from block building libary
const { registerBlockType } = wp.blocks;
// Import the element creator function (React abstraction layer)
const el = wp.element.createElement;


/**
 * Register Block using default icon options.
 *
 * @param   {String}    name        Block name, namespaced
 * @param   {Object}    settings    Block settings
 * @return  {?WPBlock}              Return the block or 'undefined'
*/
registerBlockType('js4wpgb/static-content', {
    title: __('Custom Block', 'JS4WPGB'),
    // Icon for the block
    // Choose from here by default https://developer.wordpress.org/resource/dashicons/
    icon: 'admin-settings',
    category: 'common',
    edit( props ) {
        return el('p', {}, 'Hello world!');
    },
    save( props ) {
        return el('p', {}, 'Hello world!');
    }
});
使用自定义 SVG 图标作为区块图标
在这个示例中,我们从 simpleicons.org 下载了一个 Github 的svg图标。现在,如果你下载了这个图标,打开它,就可以看到下面的代码:
<svg role="img" viewBox="0 0 24 24" xmlns="http://www.w3.org/2000/svg"><title>GitHub icon</title><path d="M12 .297c-6.63 0-12 5.373-12 12 0 5.303 3.438 9.8 8.205 11.385.6.113.82-.258.82-.577 0-.285-.01-1.04-.015-2.04-3.338.724-4.042-1.61-4.042-1.61C4.422 18.07 3.633 17.7 3.633 17.7c-1.087-.744.084-.729.084-.729 1.205.084 1.838 1.236 1.838 1.236 1.07 1.835 2.809 1.305 3.495.998.108-.776.417-1.305.76-1.605-2.665-.3-5.466-1.332-5.466-5.93 0-1.31.465-2.38 1.235-3.22-.135-.303-.54-1.523.105-3.176 0 0 1.005-.322 3.3 1.23.96-.267 1.98-.399 3-.405 1.02.006 2.04.138 3 .405 2.28-1.552 3.285-1.23 3.285-1.23.645 1.653.24 2.873.12 3.176.765.84 1.23 1.91 1.23 3.22 0 4.61-2.805 5.625-5.475 5.92.42.36.81 1.096.81 2.22 0 1.606-.015 2.896-.015 3.286 0 .315.21.69.825.57C20.565 22.092 24 17.592 24 12.297c0-6.627-5.373-12-12-12"/></svg>这里要注意的重要部分是SVG标签必须具有
viewBox=””属性。
添加css类名到svg
如果你希望能够缩放图标,或者想要使用CSS更改图标的颜色,最好是添加自定义类到SVG标签中,如下所示:
<svg class="custom-icon custom-icon-github" role="img" viewBox="0 0 24 24" xmlns="http://www.w3.org/2000/svg"><title>GitHub icon</title><path d="M12 .297c-6.63 0-12 5.373-12 12 0 5.303 3.438 9.8 8.205 11.385.6.113.82-.258.82-.577 0-.285-.01-1.04-.015-2.04-3.338.724-4.042-1.61-4.042-1.61C4.422 18.07 3.633 17.7 3.633 17.7c-1.087-.744.084-.729.084-.729 1.205.084 1.838 1.236 1.838 1.236 1.07 1.835 2.809 1.305 3.495.998.108-.776.417-1.305.76-1.605-2.665-.3-5.466-1.332-5.466-5.93 0-1.31.465-2.38 1.235-3.22-.135-.303-.54-1.523.105-3.176 0 0 1.005-.322 3.3 1.23.96-.267 1.98-.399 3-.405 1.02.006 2.04.138 3 .405 2.28-1.552 3.285-1.23 3.285-1.23.645 1.653.24 2.873.12 3.176.765.84 1.23 1.91 1.23 3.22 0 4.61-2.805 5.625-5.475 5.92.42.36.81 1.096.81 2.22 0 1.606-.015 2.896-.015 3.286 0 .315.21.69.825.57C20.565 22.092 24 17.592 24 12.297c0-6.627-5.373-12-12-12"/></svg>在古腾堡编辑器中使用SVG
要在古腾堡编辑器中使用SVG图标,我们需要创建js文件,这里命名为 icons.js,包含下面的内容:
const icons = {};

icons.github = <svg class="custom-icon custom-icon-github" role="img" viewBox="0 0 24 24" xmlns="http://www.w3.org/2000/svg"><title>GitHub icon</title><path d="M12 .297c-6.63 0-12 5.373-12 12 0 5.303 3.438 9.8 8.205 11.385.6.113.82-.258.82-.577 0-.285-.01-1.04-.015-2.04-3.338.724-4.042-1.61-4.042-1.61C4.422 18.07 3.633 17.7 3.633 17.7c-1.087-.744.084-.729.084-.729 1.205.084 1.838 1.236 1.838 1.236 1.07 1.835 2.809 1.305 3.495.998.108-.776.417-1.305.76-1.605-2.665-.3-5.466-1.332-5.466-5.93 0-1.31.465-2.38 1.235-3.22-.135-.303-.54-1.523.105-3.176 0 0 1.005-.322 3.3 1.23.96-.267 1.98-.399 3-.405 1.02.006 2.04.138 3 .405 2.28-1.552 3.285-1.23 3.285-1.23.645 1.653.24 2.873.12 3.176.765.84 1.23 1.91 1.23 3.22 0 4.61-2.805 5.625-5.475 5.92.42.36.81 1.096.81 2.22 0 1.606-.015 2.896-.015 3.286 0 .315.21.69.825.57C20.565 22.092 24 17.592 24 12.297c0-6.627-5.373-12-12-12"/></svg>

export default icons;
在这个示例中,我们使用名为 icons 的javascript对象来存储SVG图标。这样,我们可以添加多个图标,并将它们全部放在一个位置。请注意,SVG数据周围没有括号。
为古腾堡插件自定义图标
古腾堡(Gutenberg)中的许多功能和组件都有图标的属性,你可以在其中简单地传递对该图标的引用。像下面的示例一样,我们首先导入icons对象,然后将github图标传递给 registerPlugin 函数,如下所示:
import Sidebar from './components/sidebar.js';
import icons from './icons/icons.js'

const { registerPlugin } = wp.plugins;

registerPlugin("myplugin", {
    icon: icons.github, // The Plugin icon
    render: Sidebar
});
为古腾堡区块自定义图标
区块的处理过程几乎相同。只需导入图标对象,然后将图标传递给registerBlockType 函数,如下所示:
const { __ } = wp.i18n;
const { registerBlockType } = wp.blocks;
import icons from './icons/icons.js'

registerBlockType("va79/blockname", {

    title: __("Blockname"),
    icon: icons.github, // The Block icon
    category: "layout",
    keywords: [__("Blockname")],
    attributes: {
        ...
    },

    edit: ( { attributes, className, isSelected, setAttributes } ) => {
        ...
    },

    save: props => {
        ...
    },

});
为组件自定义图标
如果你想在自己的组件(components)中显示自定义图标,则该过程需要额外的步骤,因为没有将图标传递给的图标道具。在这种情况下,你可以从wp.components导入Icon组件,并通过自己的SVG图标将其添加到你的组件中,如下所示:
import React from 'react'
import icons from '../icons/icons.js'

const { Icon } = wp.components;

class ComponentWithIcon extends React.Component {

    constructor() {

        super()

    }

    render() {
        return (
            <div>

                <Icon className="icon" icon={icons.github}/>

                <h4>Component with icon</h4>

            </div>
        )
    }

}

export default ComponentWithIcon
好了,就这样操作即可!希望可以帮助到大家。
参考资料:
- https://wp.zacgordon.com/2017/12/07/how-to-add-custom-icons-to-gutenberg-editor-blocks-in-wordpress/
- https://vanaf1979.nl/wordpress-adding-custom-svg-icons-to-your-gutenberg-blocks-plugin/


